Purpose and Use Cases
Custom fields provide a centralized way to manage properties at different levels of your organization. You can insert these as fields into event types, reminder templates, event titles, descriptions, and more. Updates made in one place automatically propagate everywhere the field is used.
This eliminates repetitive manual edits when your organization evolves—whether you’re updating contact details, service offerings, or team-specific information.
Key benefits include:
- Consistency: Information stays accurate across all communications.
- Time savings: Change data once, and it updates everywhere.
- Personalization: Tailor reminders and events without rebuilding templates.
- Flexibility: Use fields for dynamic content like websites, regions, services, or fees.
Events – Custom Fields
Custom fields at the Event level (previously called Event Type custom questions) are ideal for gathering client-specific information during the booking process.
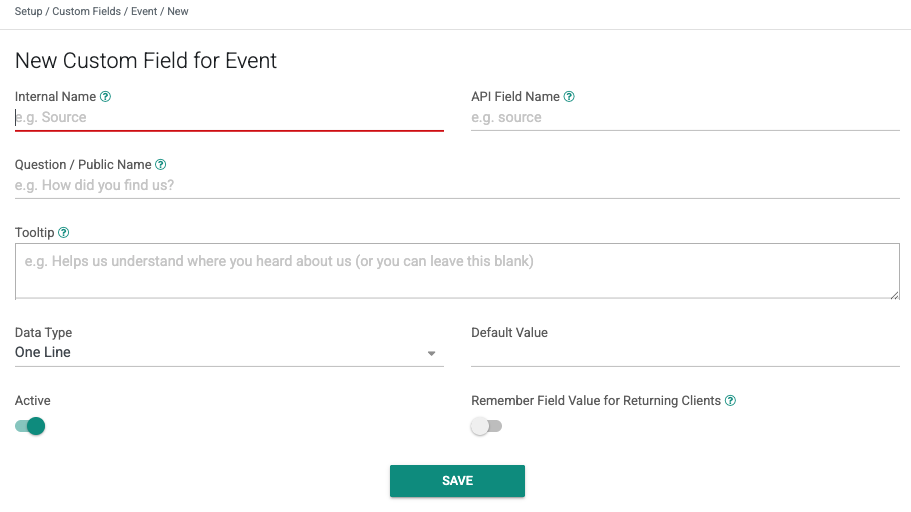
How to Set Up Event Custom Fields
- Navigate to the Custom Fields: ‘Setup‘ > ‘Custom Fields‘, ‘Events‘.
- Create a new custom field.
- Define:
- The Name (internal/backend reference and field name)
- Question (what clients see)
- Tool Tip (optional guidance)
- Data Type (e.g., one line, multiple lines, dropdown, checkboxes, etc.).
- Mark the field as required or optional.
- Save the field.

Once saved, A Field will generate. This can now be used as a question in any Event Type, or added as a field to reminders, event titles, descriptions, locations, and more.
Example Use Case
Ask clients “What is the main goal for this meeting?” during booking. The answer becomes a field you can insert into a confirmation reminder or calendar invitation for better preparation.
These event-level fields focus on per-booking data collection and remain separate from organization-wide properties.
Company – Custom Fields
Company (or Organization) custom fields store information that applies at the organizational level. These are perfect for details like your company website, branding elements, or general policies that should remain consistent across the entire platform.
- Navigate to the Custom Fields: ‘Setup‘ > ‘Custom Fields‘ > ‘Company‘.
- Create a new custom field.
- Define:
- The Name (internal/backend reference and field name)
- Question (what clients see)
- Tool Tip (optional guidance)
- Data Type (e.g., one line, multiple lines, dropdown, checkboxes, etc.).
- Mark the field as required or optional.
- Save the field.
- Save the field. A Field (e.g.,
{{My Company Website}}) will appear for use elsewhere.

Example: Company Website (with HTML Support)
Let’s use the company website as the example.
- Name: Company Website
- Question: Company Website
- Tool Tip: Enter the main company website URL. Use HTML format for a clickable link in reminders and invitations.
- Data Type: HTML (or One Line if you prefer plain text)
After saving, go to Setup → General. Enter the value:
<a href="https://coaanalysis.com/">https://coaanalysis.com/</a>This renders as a clickable hyperlink.
Using the Field
- Navigate to Client Reminders (under Reminders) and create or edit a template.
- In the content editor, use the Insert Field dropdown. Company fields appear as “My Company [Field Name]” (e.g., “My Company Website”).
- Insert it into reminder text, event titles, descriptions, or location fields.
Example in a Reminder:
“Join us for your meeting. Visit our website for more resources: {{My Company Website}}”
Preview the reminder to see the rendered HTML link.
You can also paste the field directly into Event Type titles or custom location fields. When the website changes, update it once in Company settings—all references update automatically.
Team – Custom Fields
Team custom fields apply to specific teams within your organization. These are useful when different teams handle distinct regions, service lines, or processes.
How to Set Up Team Custom Fields
Set up mirrors Company fields:
- In Custom Fields, select the Team tab and create a new field.
- Define Name, Question, Tool Tip, and Data Type (e.g., dropdown for regions, text for team-specific notes).
- Save to generate the field.

Example Use Case: Region or Service Area
- Name: Team Region
- Question: Team Service Region
- Data Type: Dropdown or One Line
Then, go to Management → Teams → select a team → Settings. Populate the field (e.g., “North East” or “West Coast”).
Team fields appear in the Insert Field dropdown as “My Team [Field Name]”.
Use them in reminders or event details to specify “This meeting is hosted by our {{My Team Region}} team.”
User – Custom Fields
User custom fields are set at the individual user level. These allow personalization based on a specific advisor, representative, or team member.
How to Set Up User Custom Fields
- In Custom Fields, select the User tab and create a new field.
- Define Name, Question, Tool Tip, and Data Type.
- Save to generate the field.

Example Use Case: Services Offered or Advisor Type
- Name: Advisor Services
- Question: Services Offered by This Advisor
- Data Type: Multiple lines or checkboxes
Then, go to Setup → Users, select the user, and edit their profile. Populate the custom field(s) for that individual (e.g., “Medicare Consultations, Insurance Advising, Retirement Planning”).
User fields appear in the Insert field dropdown as “My [Field Name]” (e.g., “My Advisor Services”).
Insert them into reminders: “Your advisor {{User Name}} specializes in {{My Advisor Services}}.”
Best Practices and Tips
- Fields: Always use the generated fields rather than hard-coding text. This ensures automatic updates.
- Data Types: Choose HTML when you need rich formatting (links, bold text, etc.) that should render in reminders and invitations.
- Consistency: Keep Name and Question similar for clarity.
- Testing: Use the Preview function in reminders to verify how fields (including HTML) appear to clients.
- Scalability: Start with high-impact fields (like website or region) before expanding.
GReminders’ expanded custom fields feature streamlines communication and enhances personalization. By managing properties at the Event, Company, Team, and User levels and integrating them seamlessly as fields, organizations can maintain consistency and efficiency with minimal effort.
Whether you’re updating your company website, team regions, or individual user services, changes propagate automatically—saving time and reducing errors.
That’s it! Any questions? Please email [email protected]
Happy Scheduling!