
GReminders has appointment scheduling features that allow Real Estate Agents to book property showings quickly and easily, send automated reminders, and even help with marketing. View the short video and you’ll find complete instructions below on how to accomplish everything shown.
Book Appointments Directly on your Calendar
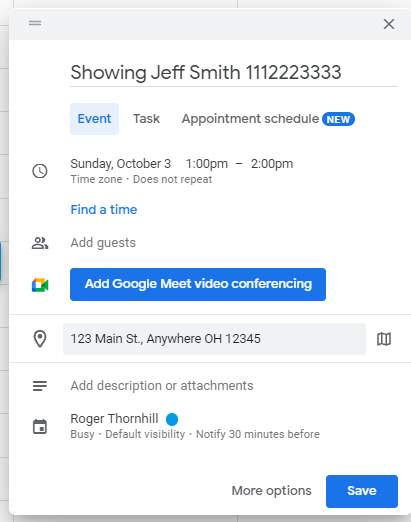
This couldn’t be easier. Simply include your client’s name and phone number in the title or description of your Google or Outlook calendar event and include the property location. In the example below, I’ve used the word “Showing” in the title to trigger reminders for this event. If you have a reminder set to go out to “All” events, you do not need any special wording in the title.
Setting up Text Reminders
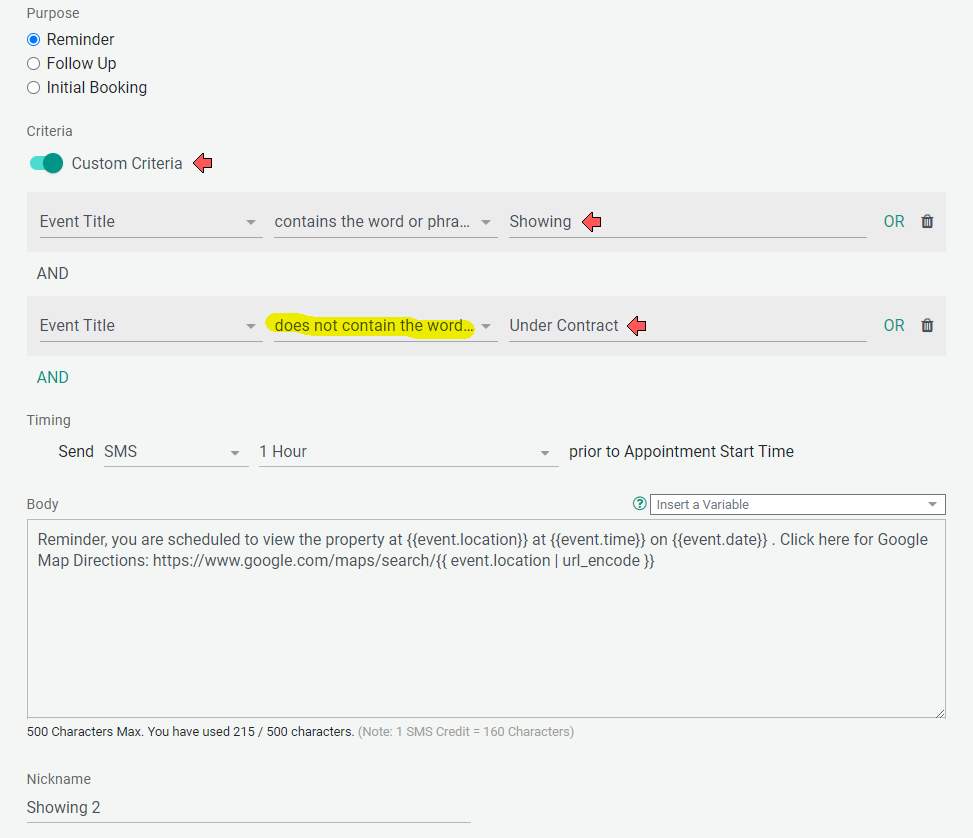
Create Reminders by going to Client Reminders, or Reminder Templates under the Management menu. The reminder template shown above will trigger an SMS reminder to go out to the client booked on the calendar in this example. Notice there are two Criteria, the Event Title contains the word or phrase “Showing” and does not contain the word or phrase “Under Contract”. The reason for the second Criteria is to allow “Under Contract” to be added to an event and stop all future reminders for this property.
Linking to Google Maps
You may wish to include a link in the last reminder that goes out to clients prior to the showing with a link to Google Maps. This way, they can open the reminder, click on the link, and get directions to the property from wherever they may be at the time. To include a link to Google Maps, use a link in this format:
https://www.google.com/maps/search/{{ event.location | url_encode }}Setting up Online Booking
To create an online scheduling calendar, open Event Types under your Avatar in GReminders. In this example, we’re going to be using a pop-up calendar that’s opened with a button located next to the property description on the webpage.
Start creating your event type by labeling the event, including a description, and determining your availability and how long you wish to allow for each home showing. Leave the location blank for now.

When you get to “Questions you want to ask prior to Scheduling”, include a question asking for the property address and mention that Property Address has been Copied, Paste it Below (you’ll understand why we are doing this shortly).
Note: Custom variables are created when you create New Questions.
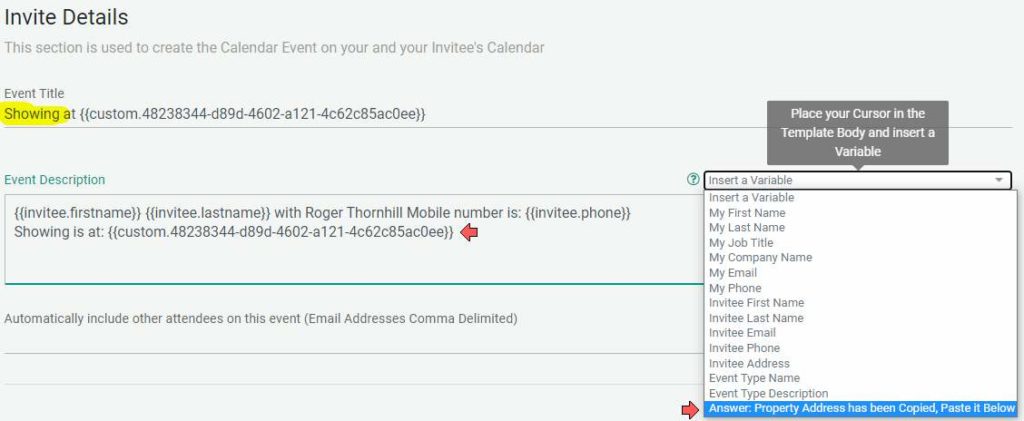
While editing the Invite Details, include a name for the event under the Event Title, in this example, “Showing”. Then, customize the message and include the address of the property to be shown. It is the Custom Variable that you created with the question, Property Address, you added above. You can access the custom variable in the Insert a Variable dropdown menu. Place your cursor where you wish to place the address and select it from the menu.
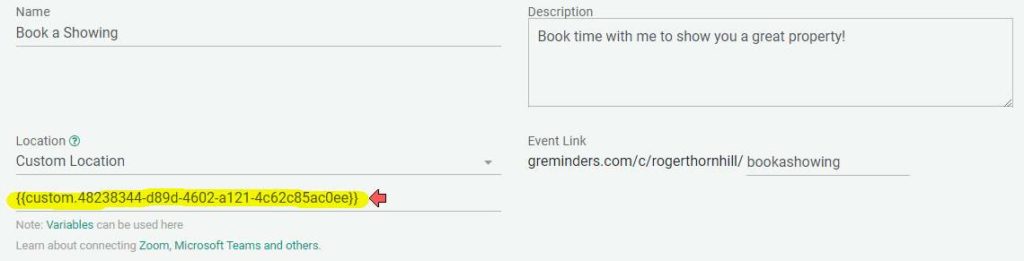
Important: Copy the custom variable and paste it into the Location input box at the top of the Event Template as shown above.
Scroll back down to the bottom of the page and save the event.
In our example, we want to create a similar event where we will notify a homeowner that a showing is being scheduled.
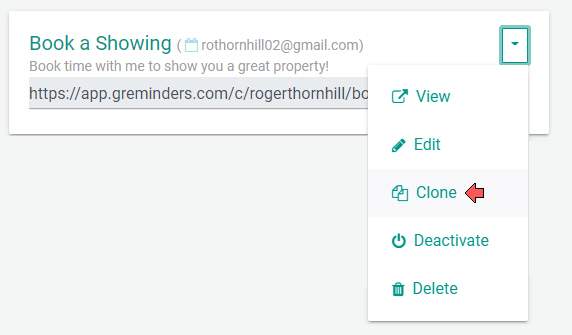
All we need to do is Clone this event and change the name slightly. In the description, you can include a message that the homeowner will need to confirm this showing and the buyer will be notified. Include a unique name in the Event Title of the Invite Details and Save.
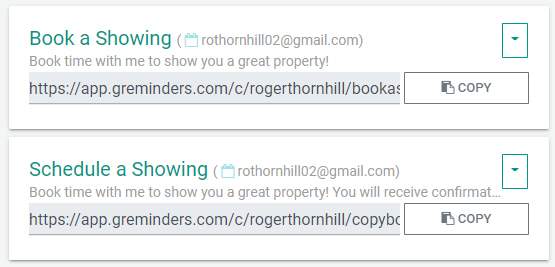
We have now created two calendar events. Notice the copy button to the right of each event. We will use those shortly.
Creating a Pop-Up Button for your Website
We will now need to edit our website code so we can include a pop-up button next to each property. This will open our booking calendar.
In the head section of your webpage, include the following javascript code:
<script type = "text/javascript">
function CopyMe(TextToCopy) {
  var TempText = document.createElement("input");
  TempText.value = TextToCopy;
  document.body.appendChild(TempText);
  TempText.select();

  document.execCommand("copy");
  document.body.removeChild(TempText);

}
</script>

<script type = "text/javascript">
	function popWindow() {
	    var newWindow = window.open("XXXXXXX", "greminders", "width=800, height=600");
	}
</script>

<script type = "text/javascript">
	function popIt() {
	    var newWindow = window.open("YYYYYYYY", "greminders", "width=800, height=600");
	}
</script>
In the script above, replace the Xs by copying and pasting the first event URL and replace the Ys by copying and pasting the second event type URL (be sure to leave the quotation marks in place).
In the body of the page with property listings, insert the following code near each listing to create a button that will automatically copy the address of the property and open the pop-up calendar of our first event (where no confirmation from the homeowner is needed).
<button onclick="CopyMe('INCLUDE THE PROPERTY ADDRESS HERE');popWindow()">Book a Showing for this Address</button> <- When you click here, the address will be copied to your clipboardFor properties where you need to get homeowner approval, insert the following code next to those listings in the body of the page. It will create a button that will copy the address and open a pop-up calendar for our second event:
<button onclick="CopyMe('INCLUDE THE PROPERTY ADDRESS HERE'); popIt()">Book a Showing for this Address</button> <- When you click here, the address will be copied to your clipboardSetting up Reminders when You need Approval from the Homeowner
If you need to get approval from a homeowner prior to confirming a showing, follow the steps below:
1. Set up an Initial Client Reminder
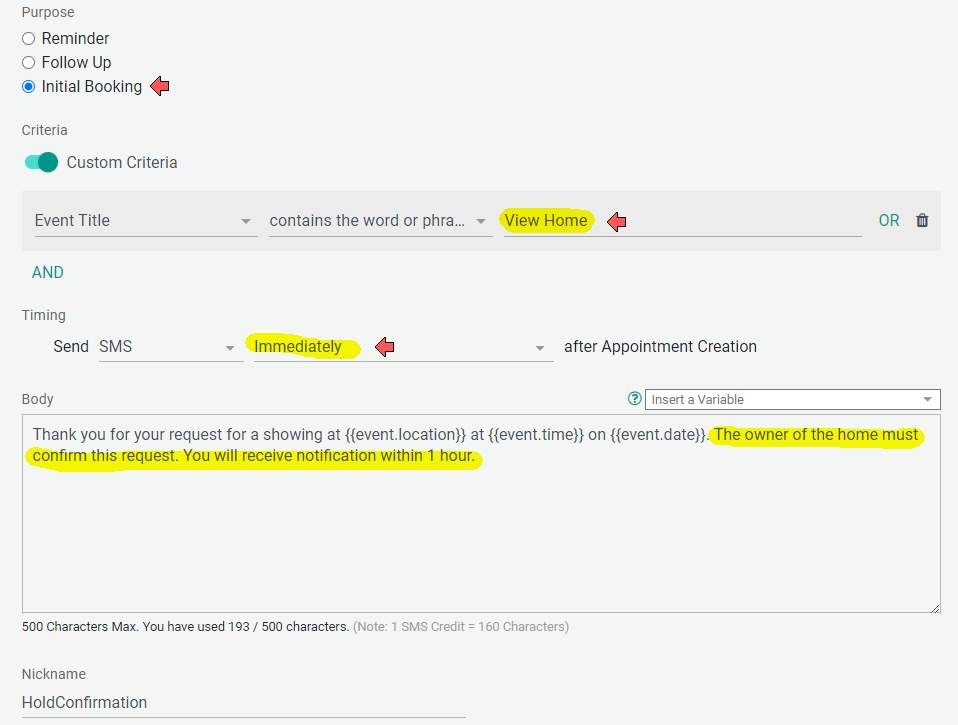
- First, you’ll need to set the purpose of this reminder to “Initial Booking”.
- Create a Criteria that matches the name of the Event Title (in this example it’s called View Home).
- Set the timing to go out Immediately.
- Include a note that the owner will need to confirm and the buyer will receive notification in 1 hour.
2. Set up an Unconfirmed Initial Client Reminder
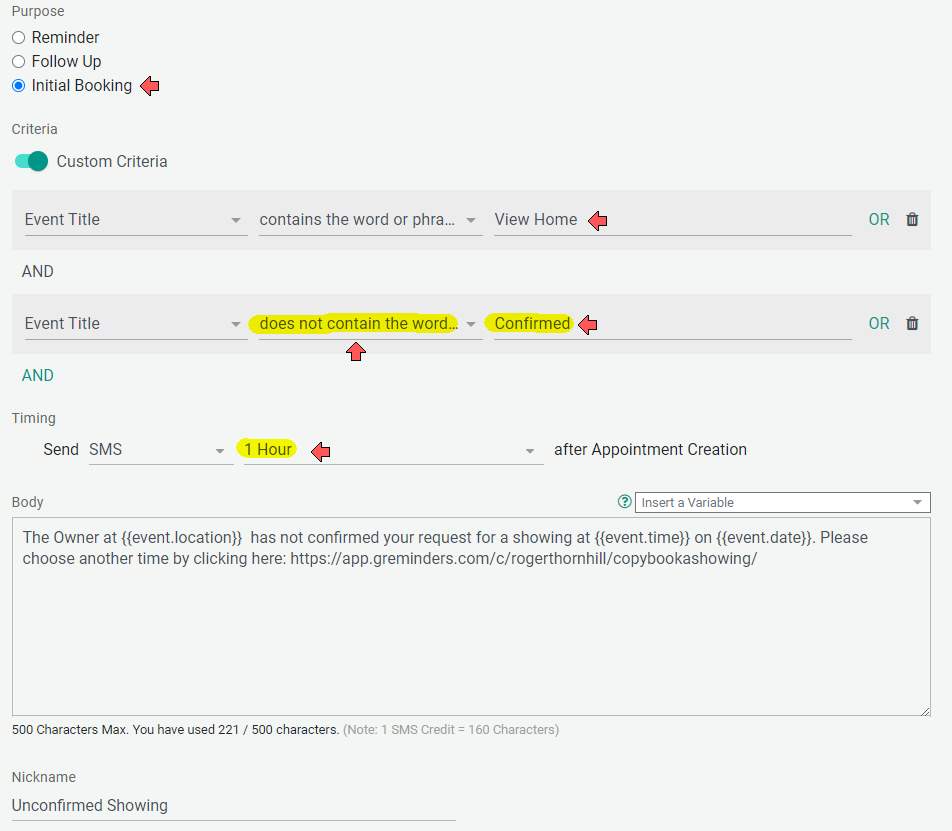
This reminder is used when an hour lapses without the word “Confirmed” added to the appointment on your calendar.
- Select “Initial Booking” as the Purpose of this reminder.
- Add a Custom Criteria that indicates the Event Title Does Not contain the word or phrase “Confirmed”.
- Set the Timing to 1 Hour.
- Include a reschedule link or a link back to your website with the property listings.
3. Set up a Confirmed Client Reminder
This Reminder is identical to the previous reminder except the second Custom Criteria is “Event Title Contains the Word or Phrase Confirmed”
If the homeowner confirms and you add the word “Confirmed” to the calendar appointment title, your client will receive this reminder instead of the Unconfirmed Reminder.
4. Setting up a Confirmation Reminder for the Homeowner
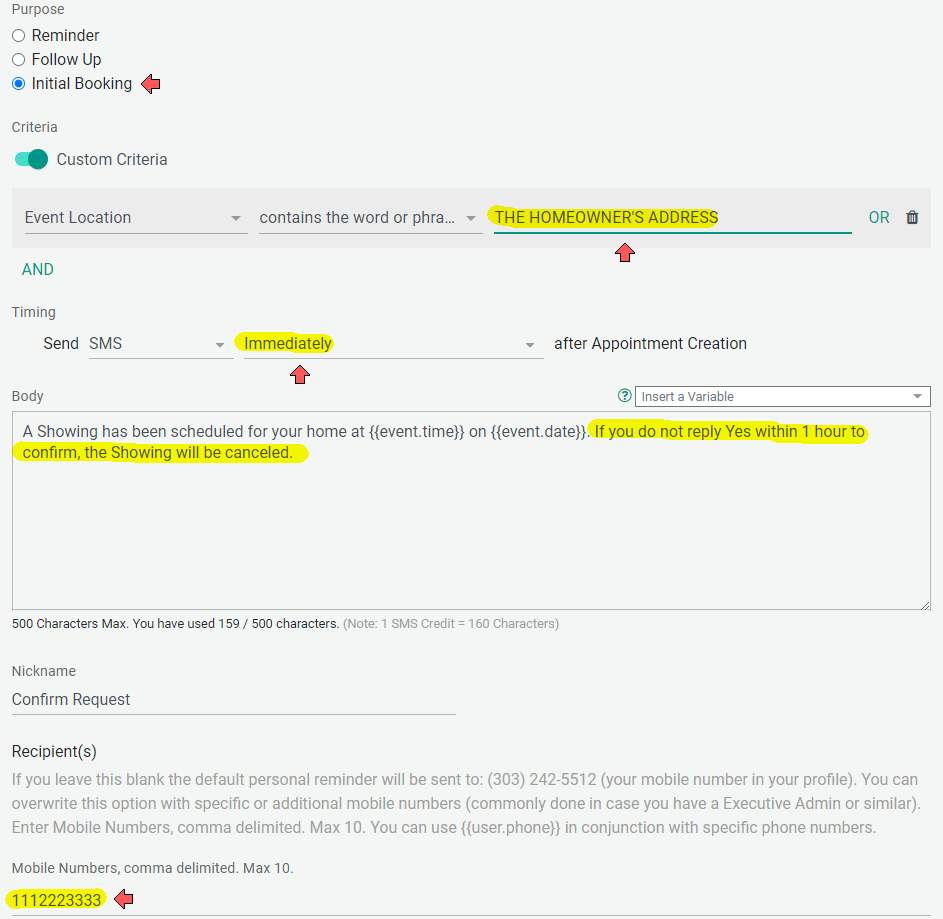
The Request that the homeowner receives is actually a Personal Reminder. To set up Personal Reminders, access your Profile (under the Avatar) and select Personal Reminders from the menu on the left.
- Choose Initial Booking as the Purpose
- Select Custom Criteria and this time, select Event Location Contains the word or phrase and include the Home Owner’s address (or at least the street address that matches what is in the location on your calendar).
- Indicate the Timing as Immediately
- Include verbiage that indicates the homeowner needs to confirm YES within 1 hour to confirm the appointment.
- Finally, Include the homeowner’s mobile number as the Recipient.
If the homeowner confirms with YES, you will receive the notification and will need to add the word “Confirmed” to the appointment on your Google or Outlook calendar. It must be done within an hour.
Note: You may wish to set up a Personal Reminder that goes out to this homeowner 30 minutes prior to the showing. Make sure you include the condition that “Event Title Contains the word…Confirmed” so the homeowner only gets the reminder if the showing is going to take place.
Sending a Text Message to Multiple Clients about a New Listing
This feature can be very useful for notifying a group of people immediately about an event.
You will first need to create Reminder Template(s).
Note: This is a Client Reminder, not a Personal Reminder.
It’s up to you how many of these Reminder Templates to create. It’s pretty easy to just edit the Keyword which will be in the Event Title, so you can determine if it’s easier to have several pre-made templates or if you just edit a single template.
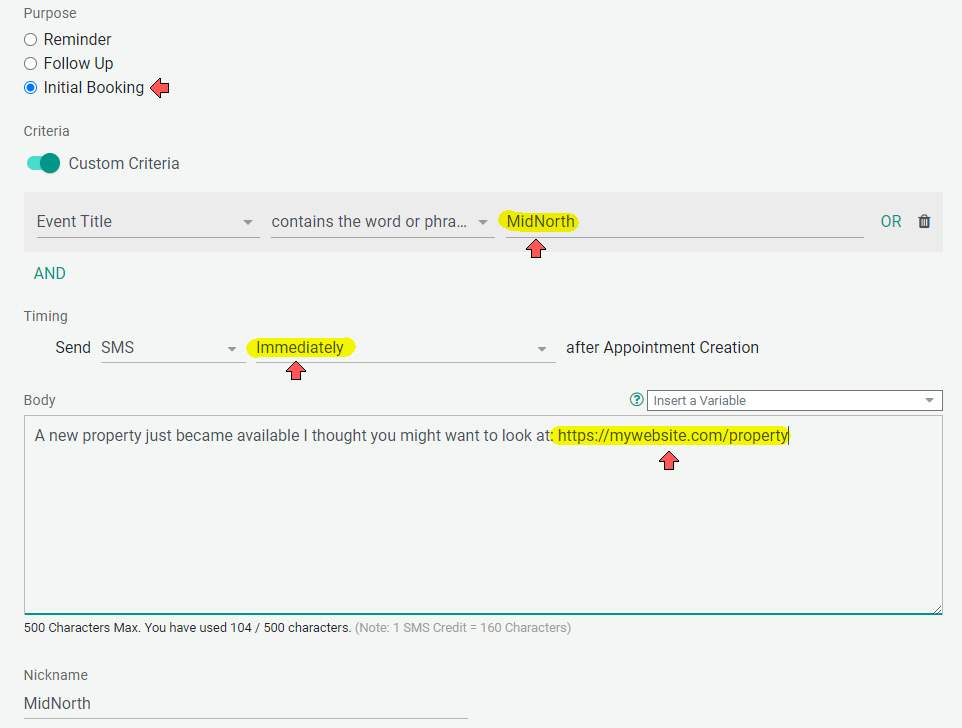
- Indicate Initial Booking for the Purpose
- Include a “Keyword” (which we’ll go into in greater detail in a moment) that will be in the Event Title (or leave blank and edit as you send these reminders out)
- Set Timing to Immediately.
- Make sure there’s a link to a page where your client can view information about the property.
Creating Keywords

Under the Org Settings menu, select Keyword > Add a Keyword.
Determine a Keyword that best describes what type of property a group of individuals may be interested in. In the example, the Keyword MidNorth is used for Mid-priced homes in the Northern Suburbs. You could have Mountain View or Ocean View as a Keyword.
Then, include the mobile numbers of clients who would be interested in a particular type of property. You can see that you could include the same number in multiple lists.
If you use this method to send reminders, make sure you are diligent about removing numbers from the list for clients who may have purchased a property and are no longer interested in receiving alerts. You may also want to ask buyers if they would like to receive alerts on new properties.
Creating a Group Reminder “Alert” on your Calendar
Once you have your Reminders and Keywords set up and a property comes on the market you would like to send out an SMS text message alert, open your Google or Microsoft calendar.
You should create a separate calendar just for alerts, in this example, we’ll call it Blast.
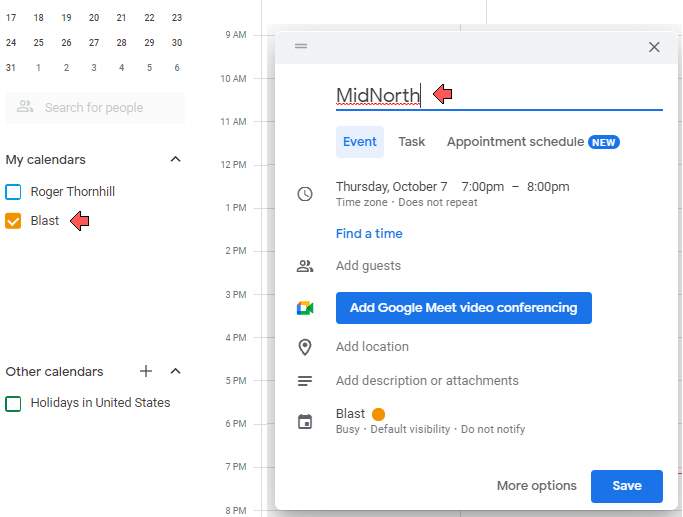
Now, all you need to do is create a calendar event in the future with the Keyword in the Title. It will trigger the Reminder to be sent to everyone associated with that particular keyword.
GReminders has appointment scheduling features that help Real Estate Professionals increase productivity and take home bigger commissions. If you’re a current GReminder user and you haven’t taken advantage of the features and applications shown here, try them out. Not a GReminder user? Click on the Try it Free Today button below and request a one-on-one system set up to help you get familiar with the program.
Contact us at [email protected] if you have any questions.
Happy Scheduling.