Routing clients to the right individual in your organization is essential for providing optimal customer service, greater efficiency, and overall higher conversion rates and retention. GReminders provides an easy way to accomplish this.
You no doubt have experienced routing countless times on the phone. “Press 1 to be connected to sales, press 2 to talk with someone about your bill, etc.” Though you may find this process somewhat annoying when you just want to speak with a person at the company you’ve called, it is a very efficient way to make sure customers are routed to the right person who can address their specific needs.
The same is also true when clients using online scheduling wish to book an appointment with your organization. Matching clients with the right expert in your company only makes sense.
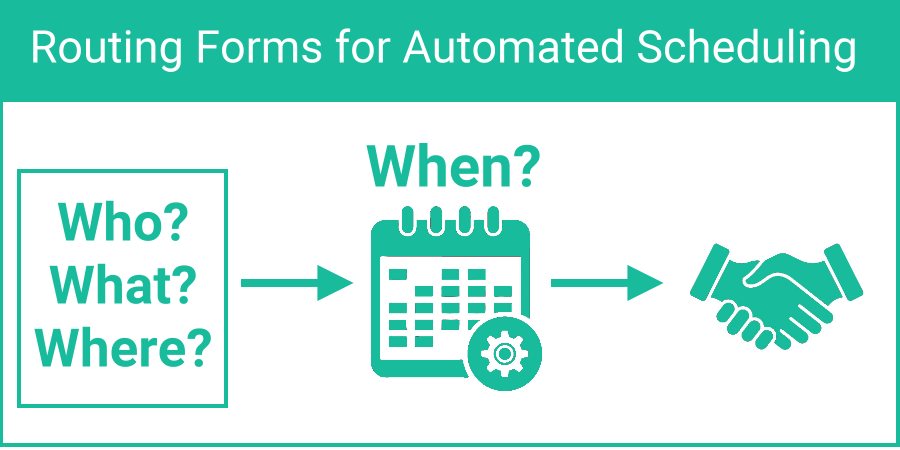
Who, What, Where, When
Using Routing Forms with automated online scheduling, GReminders gives you the tools you’ll need to make sure clients are routed to the right person in your organization during the scheduling process.
Some of the questions you may wish to address are:
Who
Determine who is attempting to schedule a meeting, an existing client or a new, prospective client. If this is a new client, do they meet the qualifications you look for in new clients? Are they a decision maker or are they exploring solutions without buying authority?
What
Find out what products or services your clients are interested in discussing or why they are scheduling a meeting. Gather details here that can help members of your team prepare for the appointment.
Where
Do you have multiple locations or do you meet outside your office? Routing can ensure that you provide the most convenient location for your clients while connecting them to the person in your organization that best meets their needs.
When
After your routing form directs your client to the right booking calendar, a date and time are selected and scheduling is completed.
Use Case
In the example below, a financial planning organization shares a link on their website allowing prospective clients to schedule an initial consultation. The goal of the routing form is to 1.) qualify the prospective client, 2.) understand their primary reason for scheduling the meeting, and 3.) making sure clients with a high net worth meet with the most senior team member.
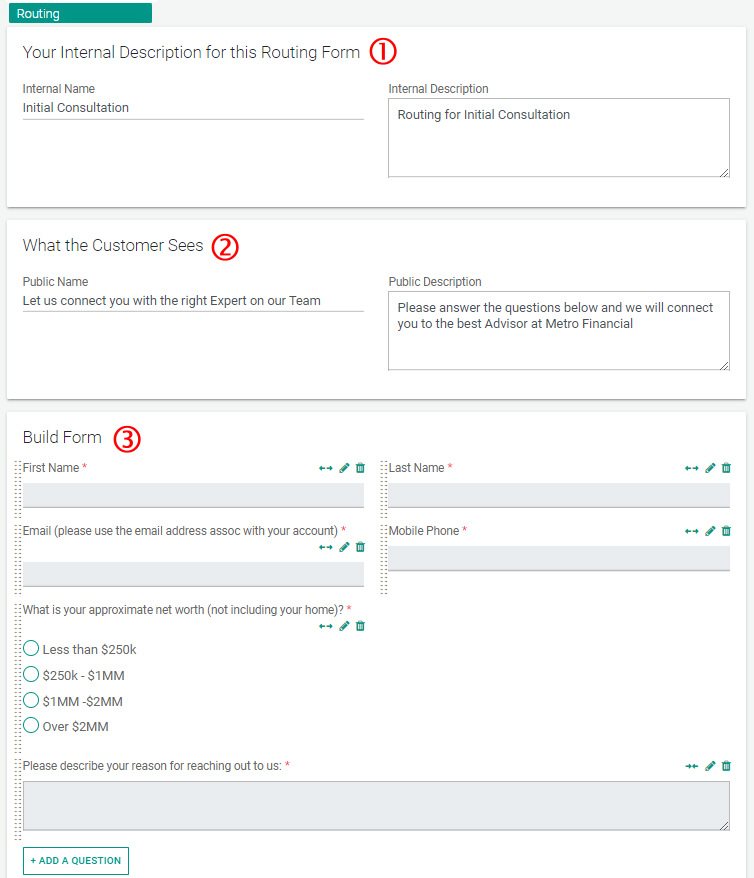
Start by opening Routing from the main menu and follow these steps:
1. Create an internal name and description for this routing form.
2. Create a public facing name and description.
3. Include questions that will help you determine which scheduling calendar to route to and any information that the person who ultimately meets with this client might need to know. You can set up custom questions and map the answers to UDF fields in Redtail or custom fields in Salesforce and other CRMs.
4. Click Save and Continue
Set up Routing Logic
After setting up your questions, you’ll work on creating logic to route your clients based on their answers. Your routing logic may look quite different depending on the number of users on your account, how many different event types will be used, etc. In the example below, we’ll set up very basic logic to cover three different criteria.
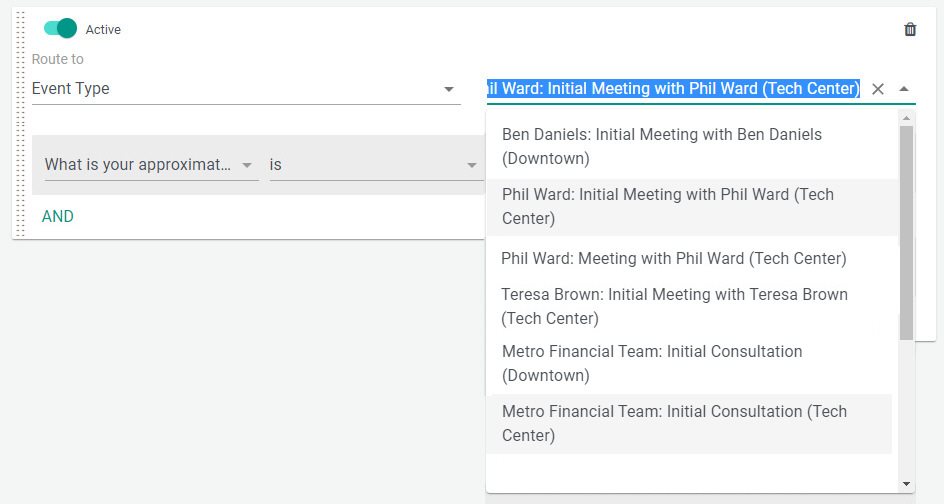
Begin by selecting an event type to route to from the drop-down list on the right. In the example above, the routing would lead to Phil Ward’s Initial meeting scheduling calendar.
Now, select the question(s) and an answer(s) that will route to the event type you’ve selected. You can include multiple questions and answers in the Route logic by selecting OR or AND.
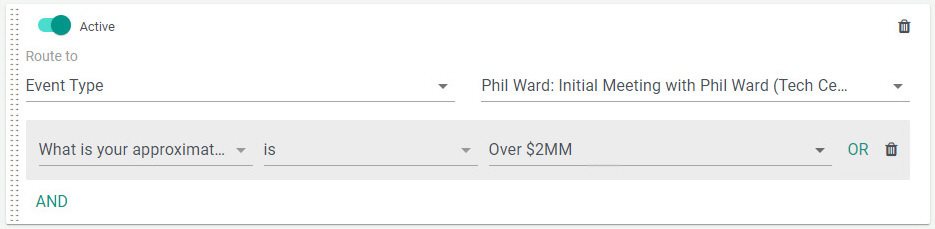
In the example above, Phil will get all initial appointments when the question, “What is your approximate net worth” is “Over $2MM”
Next we need to address instances when a prospective client doesn’t meet our qualifications to schedule a meeting:
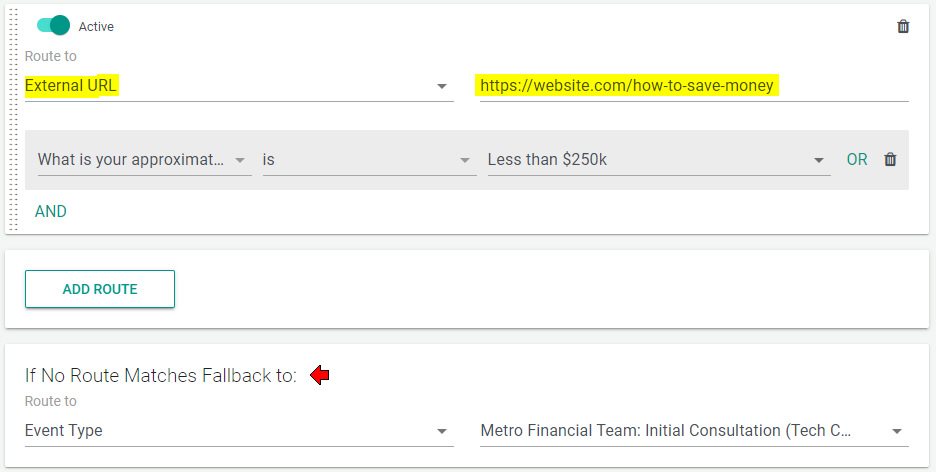
To accomplish this, we select an external URL. When a prospect answers “What is your approximated net worth” with “Less than $250k” the prospect will be routed directly to a page that politely explains the company policy along with information they may find useful.
Finally, we include a “Fallback” event type for any situation that does not match the logic we’ve set up. In the example, any prospective clients who report assets above $250k but under $2MM, would be routed to a Round-Robin team scheduling calendar.
Note: Make sure that after you have set up your logic, “Routes” that are more specific are above Routes that are broad. You can drag Routes to the different locations in the form using the drag bars on the left of each Route.
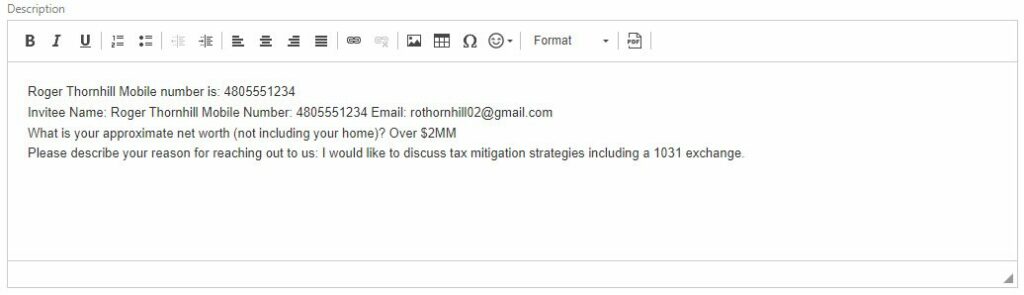
Answers Appear in you Event Description
Whether you are syncing to Google Calendar, Microsoft Outlook Calendar or Redtail Calendar, GReminders will include the questions and answers from your routing form in the calendar event/activity description (below).
Set up Routing for Multiple Office Locations
If you have multiple offices where you meet with clients, use multiple routing forms to quickly and easily route clients to the right location. This will make your routing forms much easier to create and manage with larger teams.
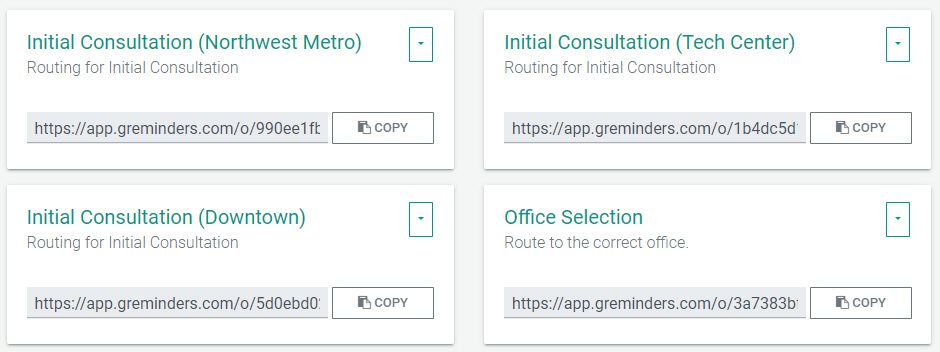
In this example, we have 3 offices. So, we create a routing form for each office and one form (called Office Selection) used only for selecting the location. Do not ask any additional questions in this form as only questions/answers in the final form prior to scheduling will be written to your calendar event description and CRM.
Notice, each routing form has a copy button that you can use to copy the link of the form. We’ll use this in the next step.
Below is an example of the first screen our clients will see when scheduling with us:
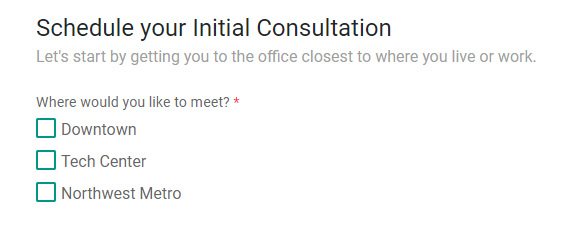
To set up the routing form, we first create the question shown above and then create logic that links to our other routing forms.
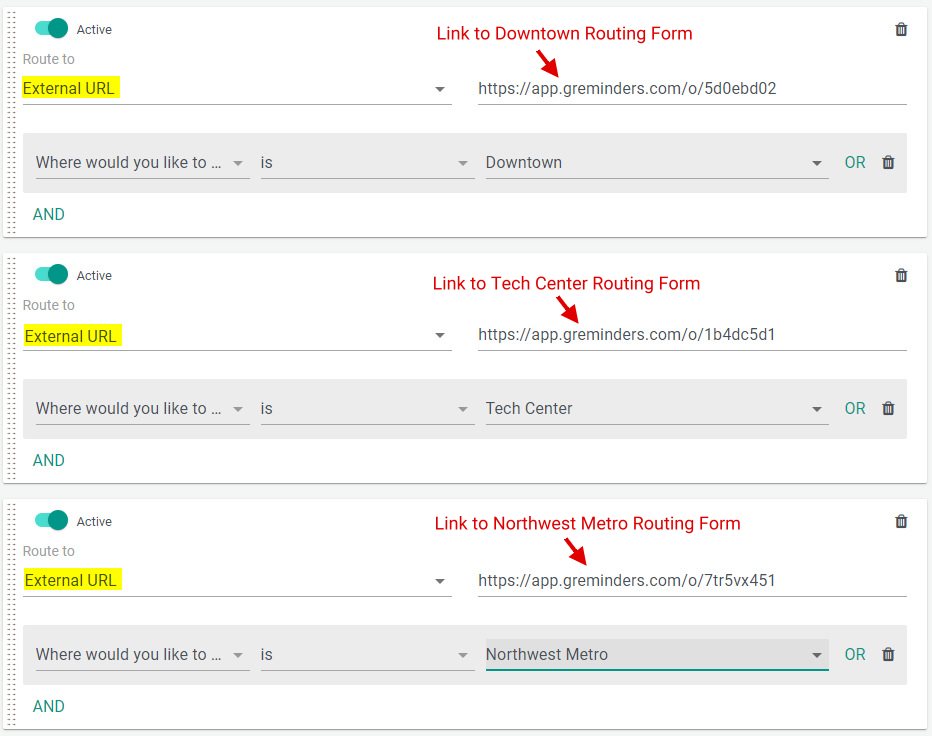
Choose “External URL” to route to and paste the link to the routing form for each location. Using this method will streamline the forms you create for each individual office. Our cloning feature will help you set up the routing for each office quickly.
Customizing your Public Routing Page
To customize the look of your routing form on GReminders, under Org Settings, choose Look and Feel and upload an image to use for all of your company’s routing forms.

You can also embed routing forms on your company website by following the directions here.
Conclusion
When clients are directed to the right expert immediately, they receive prompt and accurate assistance. This can help build trust and loyalty with your organization, leading to better customer experience and retention.
GReminders has the tools you need for simple or complex routing. If you have any questions, don’t hesitate to reach out to us here.
Happy Scheduling!
FAQs
How does GReminders help route clients to the right person in my organization?
GReminders uses Routing Forms with automated online scheduling to direct clients to the appropriate individual based on their answers to custom questions. This ensures clients are matched with the right expert during the scheduling process, improving customer service and efficiency.
Can I customize the questions and routing logic in GReminders?
Yes, you can create custom questions to gather important information from clients and set up routing logic based on their answers. You can route clients to different calendars, external URLs, or fallback options depending on the criteria you define.
How can I manage routing for multiple office locations using GReminders?
You can create separate routing forms for each office location and use an initial routing form for clients to select their preferred location. This method simplifies form management and ensures clients are routed to the correct office and team member.